Azure storage pricing can be complex, with multiple tiers, storage types, and payment options to consider. This complexity can lead to unexpected costs, ruining your Azure cloud budget. Additional fees for read/write transactions, metadata storage, snapshots, and early deletion fees can add up.
The good thing is you can review and adjust your storage configurations to minimize unnecessary costs. And by practicing several key Azure storage cost optimization best practices, you can keep your storage spend from getting out of hand.
In this guide, we’ll share a checklist of ways and areas of Azure storage costs you’ll not want to overlook, including reservations, data transfer charges, and pricing options.
What Are The Storage Options Available For Azure Storage?
Azure offers a variety of storage options designed to meet diverse needs.
We created a no-BS guide to Azure storage pricing here if you want a more in-depth, yet simplified explanation of how Azure storage charges work.
If you are looking for cost optimization techniques to apply beyond storage, check out this Azure cost optimization best practices guide.
For now, here’s the snackable version of that Azure storage pricing guide.
1. Blob storage
Azure Blob Storage is ideal for storing unstructured data like documents, images, and videos. It’s scalable and accessible via HTTP/HTTPS. Costs are based on storage capacity, transactions, and data egress.
Azure Blob Storage has three tiers, each with its most suitable use case:
- Hot Tier: Costs the most and is ideal for frequently accessed data.
- Cool Tier: Suitable for storing infrequently accessed data that requires immediate availability whenever needed. It’s considerably less expensive than the Hot tier.
- Archive Tier: This is suitable for rarely accessed data with flexible retrieval times. It is the cheapest Azure Storage option out of the three.
You can automatically move your data from one of these tiers to the next, cheaper option based on access patterns. This can reduce your costs. We’ll dive into how to do that a bit later.
2. File storage
Azure Files provides fully managed file shares accessible via the SMB protocol. This option is optimized for shared storage for lift-and-shift applications and file shares across multiple VMs.
Pricing is based on provisioned storage capacity and data egress. You can choose from Premium and Standard tiers.
To optimize costs, you’ll want to choose the appropriate tier based on performance needs and only provision the storage you need.
3. Table storage
Azure Table Storage is a NoSQL datastore for structured data. It’s fast and cost-effective for large volumes of data. Its pricing is based on the amount of data stored and read/write operations.
If you need to support rapid development and scalable applications that require flexible data schemas and high availability, this can be a cost-effective option compared to traditional SQL options for similar volumes of data.
One area to catch cost savings here is to use partitioning to optimize performance without compromising costs.
4. Queue storage
Azure Queue Storage is designed for large-scale, reliable messaging between applications. Pricing depends on the number of operations, ingress/egress, and storage capacity.
The most efficient use cases for this storage option include decoupling application components and supporting synchronous processing.
One optimization tip to remember here is to monitor and manage queue lengths to ensure you’re not over-provisioning.
5. Disk storage
Azure Disk Storage provides persistent, high-performance disk storage for Azure VMs. Options include Standard HDD for less critical applications, Standard SSD for general-purpose workloads, and Premium SSD for high I/O applications.
Pricing for Azure Disk storage is based on disk type, capacity, and performance tier. For maximum price-performance results, remember to match disk types to workload requirements. This way you can avoid overpaying for performance you don’t need.
Ultimately, you’ll want to understand these storage options and strategically choose the right one for your needs to significantly reduce costs while maintaining performance.
Azure Pricing Models And Storage Costs To Consider
Making sense of Azure’s pricing models can feel like trying to solve a puzzle. However, understanding them is key to optimizing your Azure storage costs. By aligning your storage strategy with the right pricing model, you can reduce waste and optimize spend on an ongoing basis.
Here’s a breakdown of the main storage pricing models in Azure, why they matter, and when best to use them:
1. Pay-As-You-Go
This is where you pay for what you use, with no upfront commitment. Charges are based on storage capacity, transactions, and data egress. Specific rates vary by storage tier (Hot, Cool, Archive).
This pricing model is ideal for dynamic or unpredictable workloads. Yet, without careful monitoring and management, costs can quickly escalate.
2. Reserved capacity
This is a commitment-based discount model where you prepay for storage capacity for one or three years to get significant discounts. You can get up to 38% savings compared to pay-as-you-go (on-demand or standard) rates for your commitment. It is a suitable option for predictable workloads.
3. Spot pricing
This storage pricing option enables you to take advantage of surplus Azure storage capacity at huge discounts. The caveat is that Azure can abruptly evict your workload with very little notice.
If you need cheap capacity for non-critical, interruptible workloads, Azure’s spot pricing can offer massive savings.
4. Consumption-based
This approach is similar to pay-as-you-go but tailored to specific services like Azure Backup or Azure Site Recovery. Charges are based on the actual service usage, including storage and operations.
It can help your Azure storage cost optimization efforts for specific scenarios, ensuring you only pay for what you actually use.
How To Optimize Azure Storage Costs (Checklist)
Optimizing Azure storage costs will require a multifaceted approach. And no, it’s not as complicated as it seems. Here’s a practical checklist to help you reduce unnecessary expenses and get the most out of your Azure storage fees:
1. Take inventory of your data types and access patterns
The first step you’ll want to take is to analyze the type of data you have in storage and both the frequency of access and importance of the data you retrieve to your daily operations. The goal here is to ensure you are keeping the right data type in the right Azure storage pricing option.
You can’t change much of the cost of retrieving frequently accessed data. But moving less frequently accessed data to the Cold or Archive tier, where storage costs are lower, can reduce storage costs for less frequently accessed data.
Here’s the kicker. You can automate this data movement. Here’s how.
2. Use Azure’s Data Lifecycle Management
Automate the movement of data to the most cost-effective storage tier based on access/usage patterns. For instance, frequently accessed data should be in the Hot tier, while rarely accessed data should be in the Archive tier. Azure Blob Storage’s lifecycle management policies automate this process.
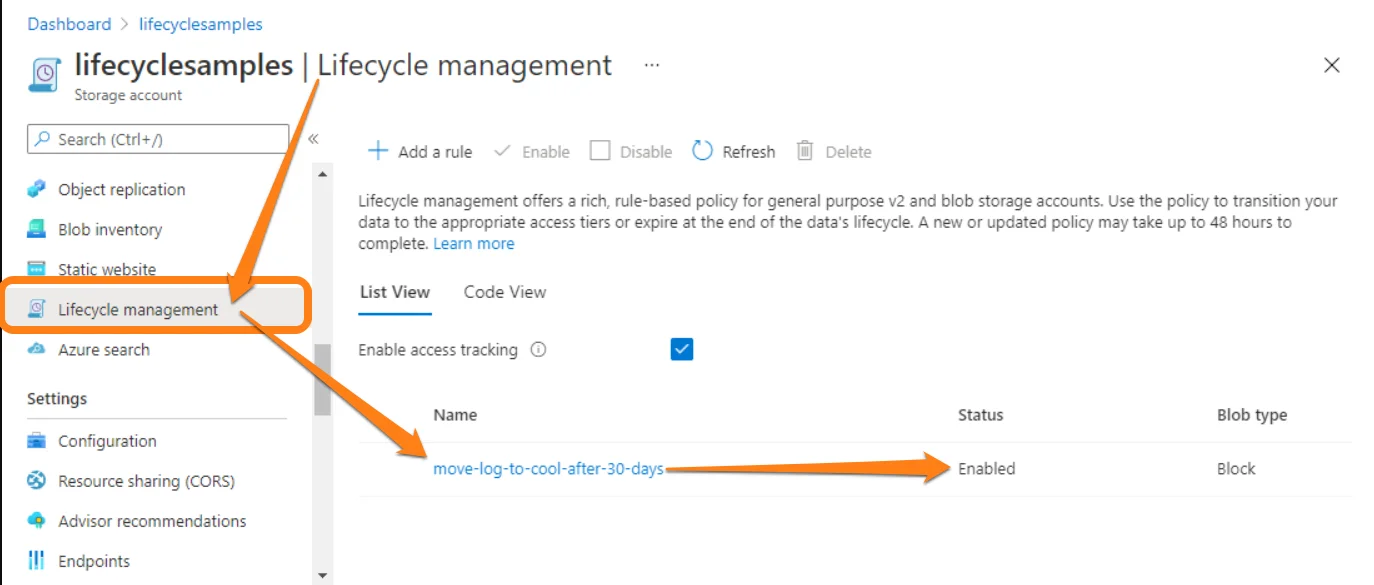
Automatically tiering your data ensures you pay the lowest possible storage rate, based on access frequency. As an example, you can set up a policy to move blobs that haven’t been accessed in 30 days from the Hot tier to the Cool tier. You can be even more specific as you can see here:
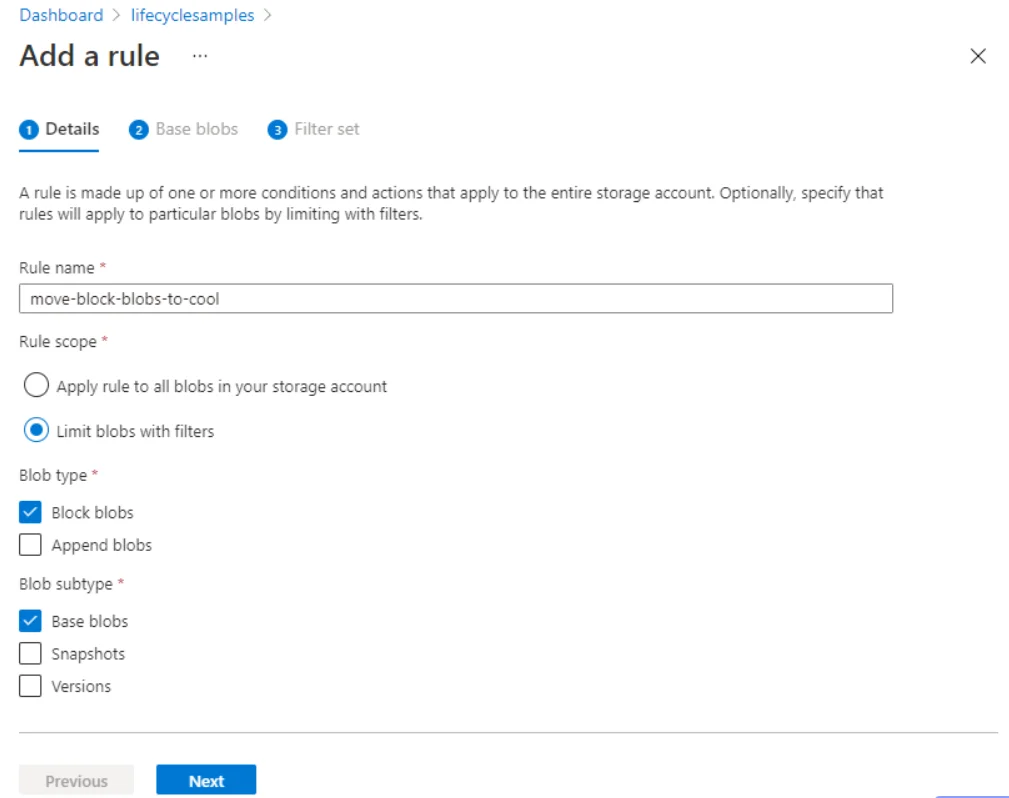
After 180 days they can be moved to the Archive tier, all without manual intervention. Ultimately, you can also delete data that hasn’t been accessed for an extended period.
That’s not all the automation to take advantage of here. Here’s another.
3. Enable Azure Autoscaling
Autoscaling dynamically adjusts your storage resources based on real-time demand, ensuring you only pay for what you need, when you need it. Say you are an e-commerce site with variable traffic.
In that case, you can use Azure Autoscaling to handle peak shopping demand. This feature subsequently scales down your resources during low-traffic times to prevent overprovisioning (a.k.a unnecessary spend).
4. Terminate unattached disks and snapshots
Unattached disks and snapshots can continue to incur storage costs even if they are no longer needed. Regular monitoring and deletion of these resources are essential to avoid unnecessary expenses.
Navigate to your Azure Storage Account and locate “Virtual Hard Disk ”. You’ll see disk properties on the overview tab. If a disk’s status is “unlocked” and its lease state is “available”, that resource is unattached to any volume. Go ahead and delete it.
Azure Scheduler can help you to automatically delete unattached disks and snapshots. You can also use Azure Resource Manager logs to check for unexpected resource usage. Better yet, you can turn on alerts to get alerts of any unexpected changes, so you can fix them.
Here’s something similar.
5. Remove unused resources
If you have VMs that were used for a project but are now idle, deallocate them to stop incurring unnecessary charges. Using tools like Azure Resource Graph and Azure Cost Management can help you identify and delete these resources.
Make this a habit, too. Regularly clean up unused or orphaned resources, such as abandoned storage accounts, for example.
6. Check for incorrectly stopped Azure VMs
It happens. However, improperly stopped virtual machines can incur ongoing costs. You’ll want to ensure that you properly shut down or delete them to avoid this “hidden” cost.
Just to be sure you’re not taking any chances, you may want to set up a standard procedure for your engineers to follow when stopping and terminating resources.
7. Use Azure Reservations for data capacity
Reserved VMs offer savings of up to 72% off the standard pay-as-you-go rate for storage. If you have predictable workloads, you can take up reservations for a one or three-year term.
Some examples of predictable workloads that can benefit from reservations include databases with consistent usage patterns and storage accounts with steady data transfer rates.
8. Load balancer data transfer
Data transferred through load balancers can incur additional charges. Monitoring load balancer metrics and setting up alerts are two ways to catch such culprits. The goal here is to learn when there is more usage than you intended, hence extra costs.
9. Unused network interfaces
This one is straightforward. Unused network interfaces can also be a source of “hidden” Azure storage costs. So, regularly review and clean up unused resources to prevent paying for the capacity you aren’t using.
10. Forgotten instances
Likewise, you’ll want to review your setup for forgotten instances. These can include orphaned snapshots or unused compute instances. Either can easily lead to cost overruns as they run in the background unnoticed for long periods.
To further counter the issue, you may want to implement Infrastructure as Code (IaC) and regularly review your storage resources to curb bleeding.
11. Right-size your storage resources
Regularly review and adjust Azure storage resources to match your actual needs. Many organizations over-provision resources to avoid performance issues, but this often leads to significant waste.
But unlike traditional, on-premise environments, you do not have to pay for more capacity than you need in the Azure cloud. You can get additional storage capacity whenever you need it with Azure Autoscaling as covered earlier.
Here’s an example. If you’re consistently running a VM that consistently uses only 55% of its allocated resources, consider scaling it down to a smaller size. You can also use a tool like Azure Advisor. Advisor recommends the right size of resources based on your consumption patterns.
12. Use Azure Hybrid Benefit
Take advantage of existing on-prem licenses, such as Windows Server or SQL Server to save up to 30% off. This benefit allows you to apply your Software Assurance-covered licenses to your VMs in Azure, reducing your overall cost.
If you have existing SQL Server licenses, applying these to your Azure SQL instances can significantly slash your database management costs.
13. Configure Azure Storage Replication
Protect against outages and disasters by replicating data in multiple locations. In addition to financial costs, data recovery can also have significant social costs.
There are several Storage Replication options available on Azure, including Locally Redundant Storage (LRS), which is the cheapest. LRS offers protection against drive and server rack failures. Be sure to check the whole range of storage replication options available to see which ones are ideal for your specific use cases.
14. Use Azure SQL Database Elastic Pools
Another way to optimize Azure storage costs is to share resources across multiple databases using Azure SQL Database Elastic Pools. This approach allows you to manage and optimize the performance of multiple databases within a single pool of resources.
For example, try combining several low-usage databases into a single elastic pool to optimize performance and costs.
15. Enable disk bursting
Disk bursting provides high performance only when needed, reducing the risk of over-provisioning (and cost overruns). This means you can temporarily exceed the disk performance of your provisioned capacity without paying for a premium Azure disk tier all the time.
You can also use tools such as Lucidity Auto Scaler to optimize performance.
16. Take advantage of Azure Dev/Test Pricing
This Azure pricing model is designed to reduce costs for development and testing environments.
Start by setting up a separate Dev/Test subscription to benefit from lower pricing for your development and testing workloads. Using Dev/Test pricing reduces non-production workload costs, freeing up your budget for other critical expenses.
17. Minimize data transfer costs
Azure data transfers can be surprisingly high, despite being less expensive than those on AWS and GCP.
Transfers between different regions incur the highest costs. Picture this:
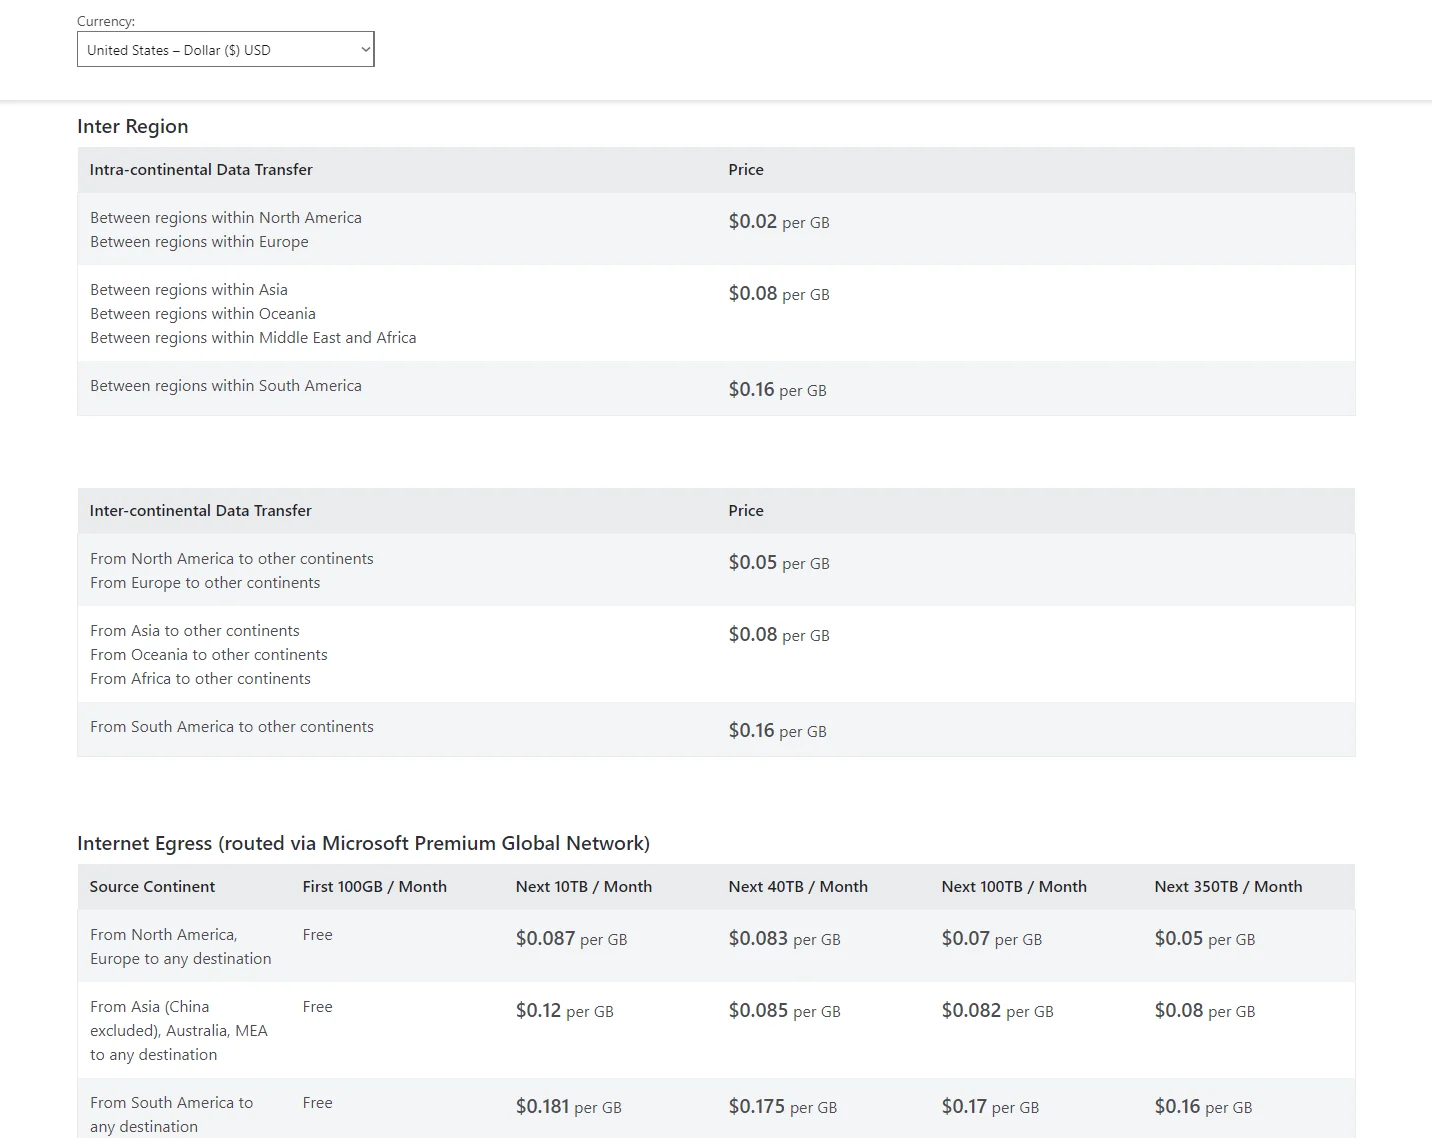
Data transfers within the same Availability Zones are free. That means one way to minimize Azure egress fees is to host your data and applications in the same region where it is processed — as much as possible, at least.
18. Tag your Azure storage resources for better management
Tagging helps your team organize and manage resources based on specific criteria, such as department, team, project, or environment. This practice improves cost tracking and allocation. More importantly, it is a practical way to identify high-cost areas to optimize.
Now, we get it. Tagging can be an endless project. However, traditional Azure cloud cost management tools, such as Azure Cost Management + Billing, rely on tags to track usage and associated costs across Azure services. That leads us to the next Azure storage cost optimization tip.
19. Use Azure cost management tools
Azure offers a suite of native cloud cost management tools through the Azure Portal. That includes the Azure Pricing Calculator, Azure Budgets, and Cost Management + Billing. These offer insights into your spending, helping you set budgets and alerts to manage costs on an ongoing basis.
You can get detailed reports on resource usage, making it easier to identify areas for optimization. For example, you can use filters to find storage costs specifically. Go to Cost Management + Billing>>Cost management>>Cost analysis>>Add filter>>Service name>>storage, like this:
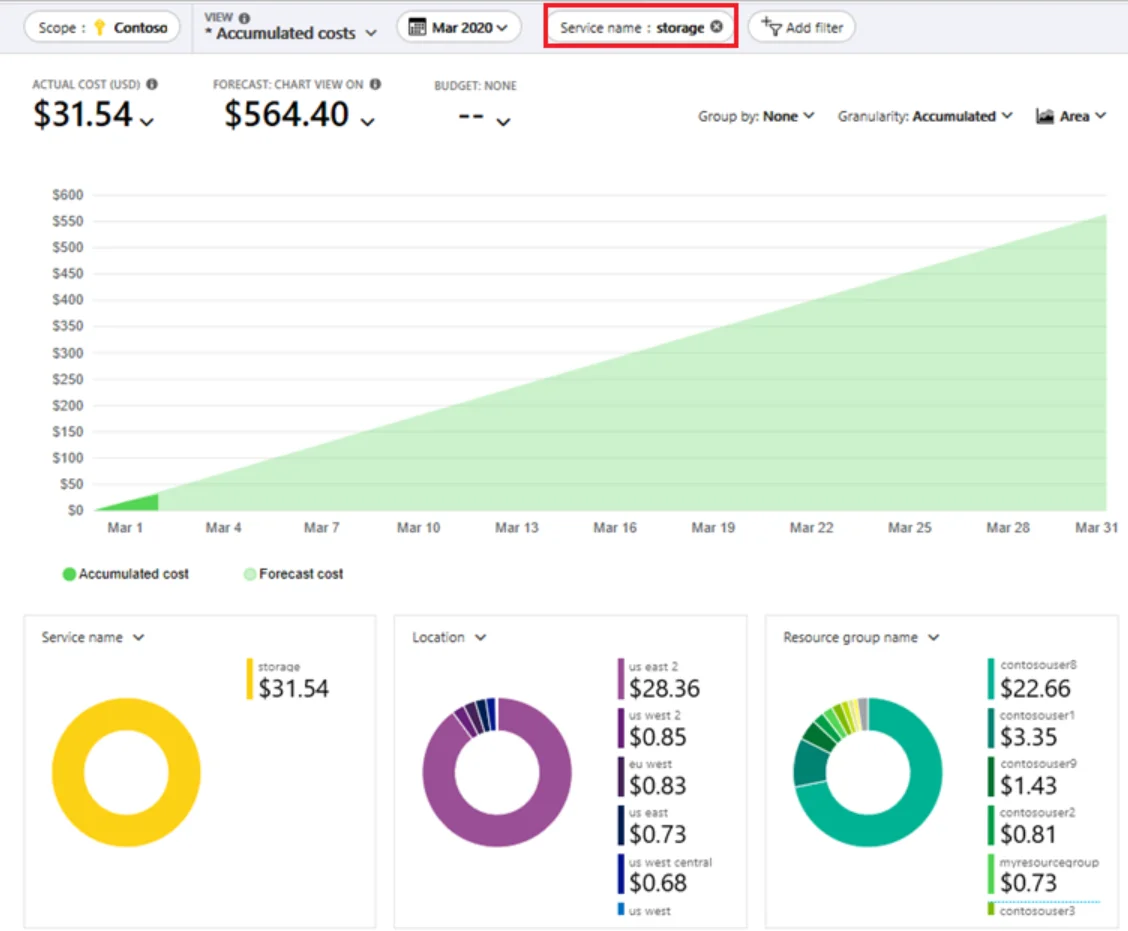
This is a useful cost tool if you need the basics, such as viewing total and average costs per department, project, and team.
To gain more granular, immediately actionable cost insights, such as Cost per Customer, Cost per Environment, and Cost per Feature, you may need to look elsewhere. Consider this:
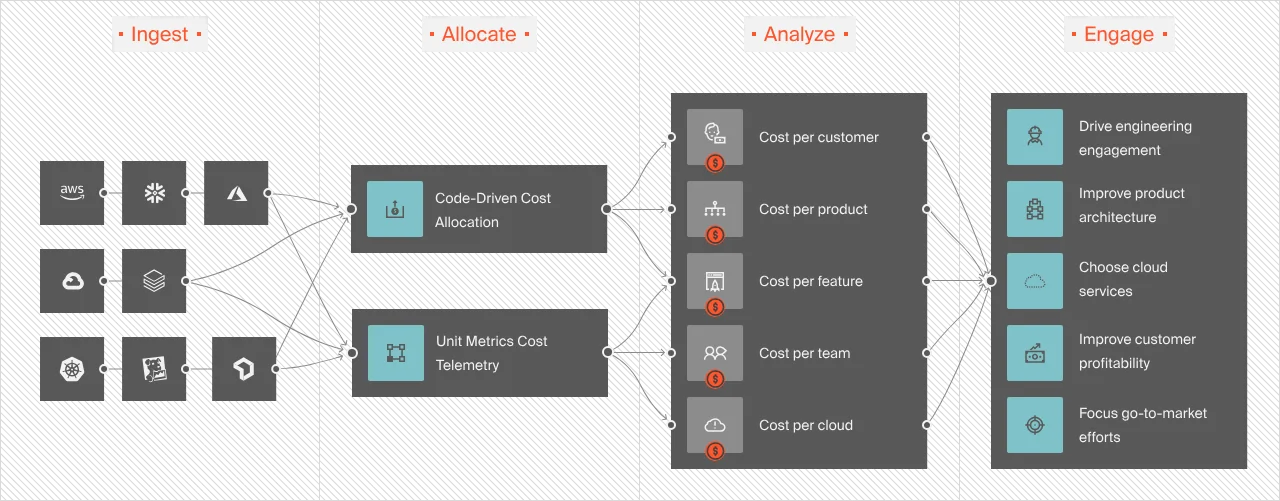
Moreover, native tools typically send cost reports once every 24 hours. Here’s the problem. If you don’t catch an issue early, it might escalate into overspending.
Oh, another thing. Native tools over-rely on endless tagging, which is not just time-consuming, but is also error-prone. This is where more robust and granular cloud cost optimization platforms like CloudZero can help you.
How To Manage, Control, and Optimize Azure Storage Costs The Smarter Way
With CloudZero, you can:
- Allocate 100% of your Azure spend, including Storage costs. This complete picture empowers you to make the right decisions around Azure storage usage and costs.
- Break through the tagging barrier. CloudZero provides precise cost tracking, analysis, and forecasting, even with imperfect tags.
- CloudZero provides hourly, actionable cost intelligence. This includes cost per customer, request, feature, team, environment, and more. You can tell who, what, and why your Azure storage costs are changing – and what to do about it.
- CloudZero brings all your cloud costs within a single platform. In addition to Azure, AWS, and GCP, it supports platforms such as Kubernetes, New Relic, Snowflake, MongoDB, and more.
- Receive timely, contextual alerts. CloudZero uses real-time anomaly detection and pinpoints issues to specific team members so they can prevent overspending.
- Get your own Certified FinOps professional on call. Yes, we’ll assign you a FinOps specialist to help you make the most of CloudZero. Takes about 3 months for CloudZero to pay for itself.
With CloudZero, LawnStarter was able to reduce its cloud storage costs by 55%. Remitly, Shutterstock, MalwareBytes, and Upstart are other brands using CloudZero. Here’s your turn.  and experience CloudZero in action for yourself.
